The MC500 and MC510 can be opened by the user. This does not void the warranty, however, any damage caused by doing so will not be covered.
The following steps will walk you through opening your MC500 and/or MC510 case, as well as auto-powering on and clearing CMOS.
Opening the MC500 & MC510 Case
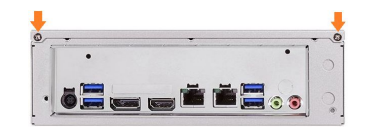
The MC500 and MC510 series chasses can be opened by removing the two screws from the back (indicated in the picture below). Slide the lid off towards the rear of the chassis.
The following sections contain instructions on how to enable Auto Power On, how to reset the motherboard via Clearing the CMOS, and manuals and drivers for your specific model. To jump to your specific model, view the product list on the right.
MC510-55
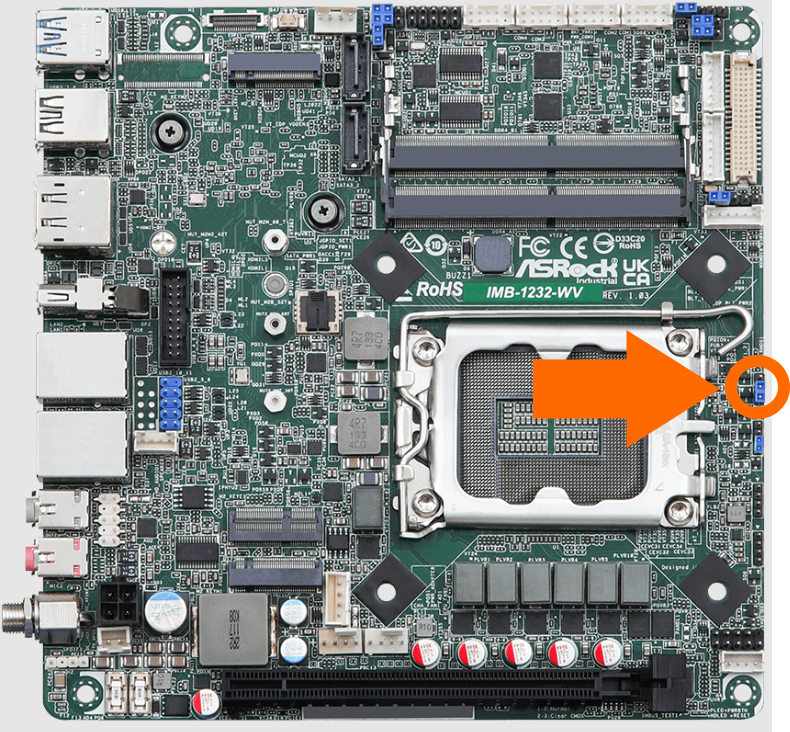
ASRock IMB-1232-WV Motherboard
Product Manual
https://static.onlogic.com/resources/manuals/OnLogic-MC510-55-MC610-55-Product-Manual.pdf
Motherboard Manual
https://static.onlogic.com/resources/manuals/IMB-1232-WV-Motherboard-Manual.pdf
Drivers
https://static.onlogic.com/resources/drivers/IMB-1232-WV
This will download drivers for Windows 10 and 11, be sure to use the drivers for your specific operating system.
BIOS Updates
| Version | Link |
|---|---|
| P1.60B | Download |
Auto Power on
Auto power allows the computer to automatically power on when power is applied/turned on. This is useful when the system needs to stay running all the time, and will come back up after a power outage. Systems can have this enabled on new orders, but you can follow these steps to enable this setting for any units in the field.
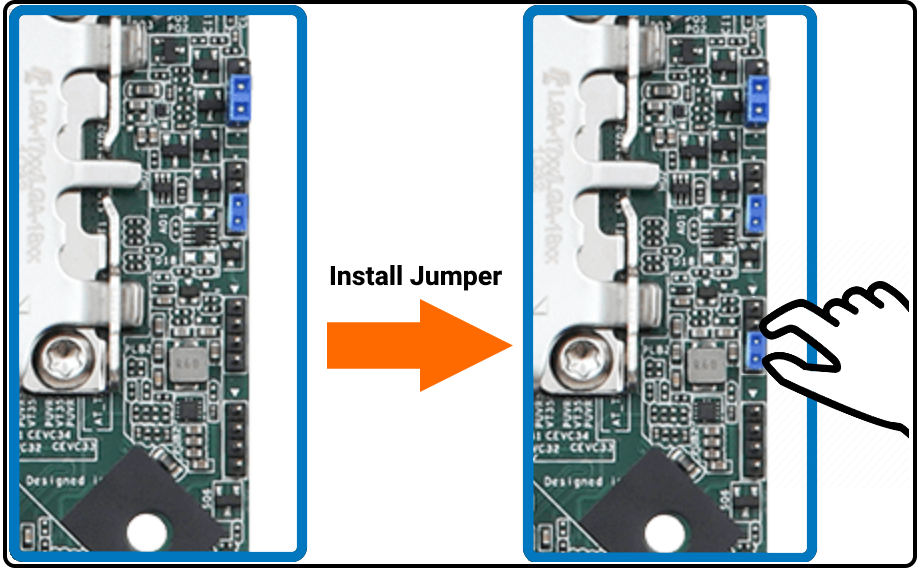
Note that you will need a 2-pin jumper to enable this setting. If you need a 2-pin jumper, you can contact our sales team to order the [HWP134] Board Jumper, 2×1. They can be contacted at info@onlogic.com, or by calling 802 861 2300 ext. 3.
- Unplug system from power and all peripherals.
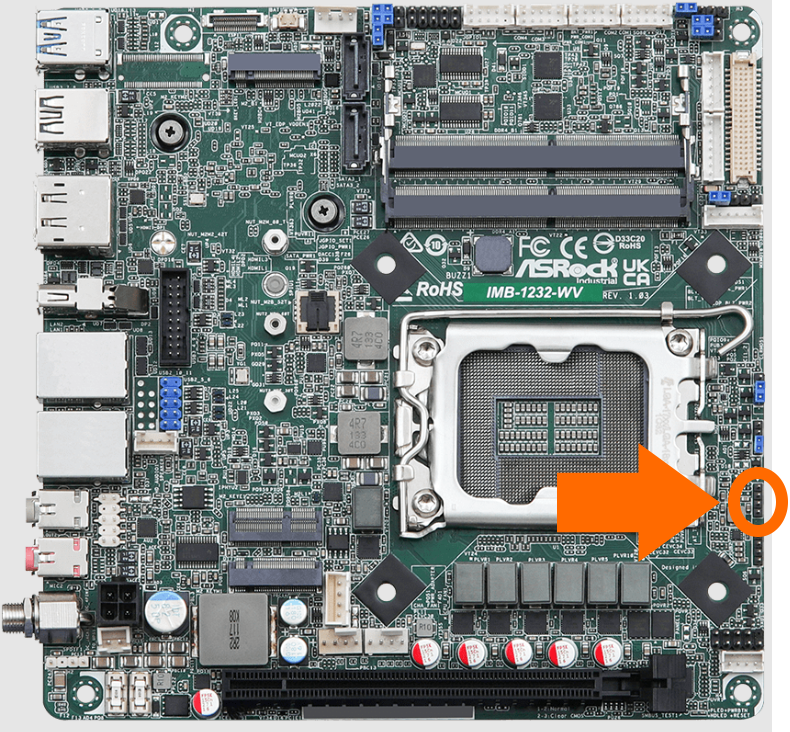
- Opening the system, then locate the 4-pin header circled in orange.
- Install 2-pin jumper to pins 3+4 as shown below:
Motherboard Reset (Clear the CMOS)
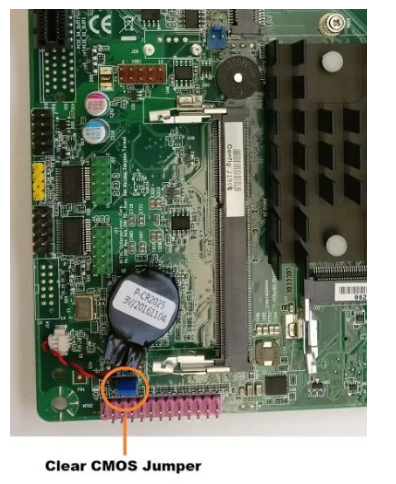
- Unplug the system completely from power and all peripherals
- Locate the clear CMOS jumper on the 3-pin header here:
- The jumper’s original position closes pins 1+2, move the jumper to the “Clear” position so that it closes pins 2+3 (move over by :
- Wait 30 seconds
- Restore the jumper to its original position
- The CMOS is now clear. Reassemble the computer and re-test.
MC510-50
ASRock IMB-1212 Motherboard
Product Manual
https://download.asrock.com/Manual/IMB-1212.pdf
Drivers
https://drive.google.com/open?id=1l9imqOhuOHG4bkKDXCb7vxUODlV-qX8m
Auto Power on
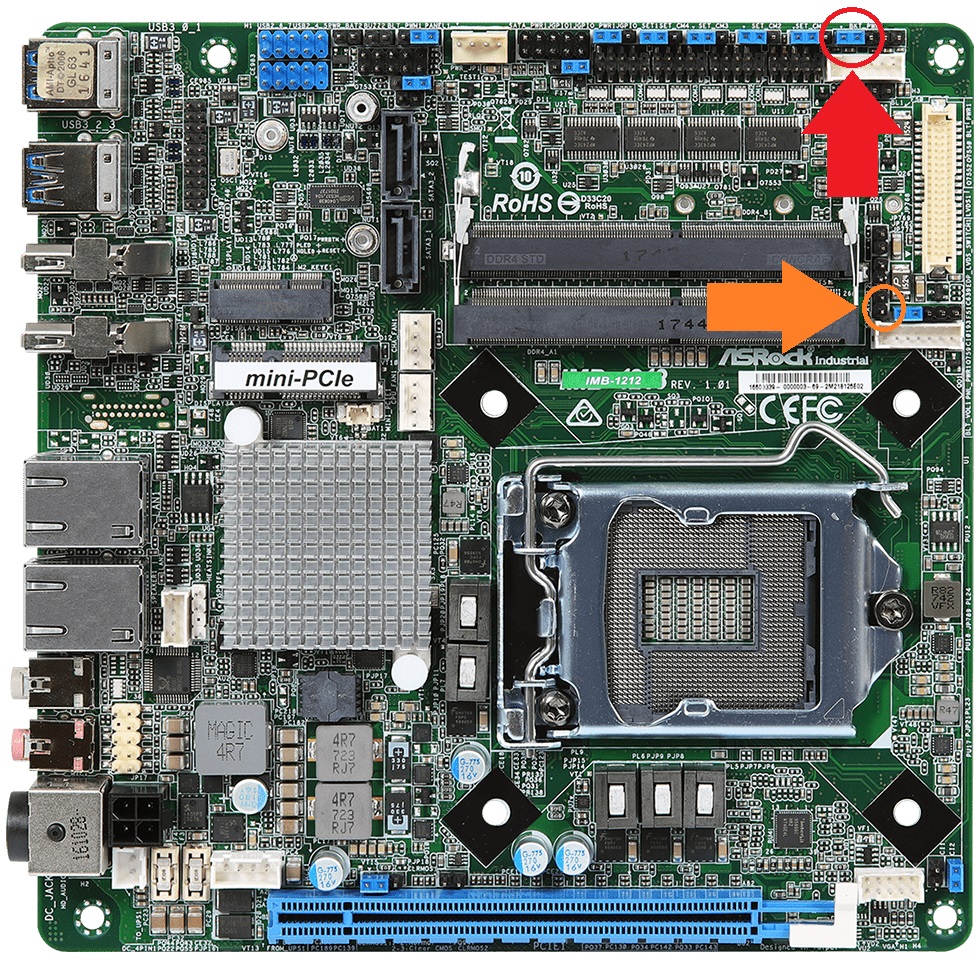
- Locate the jumper circled in red and the pin header circled in orange
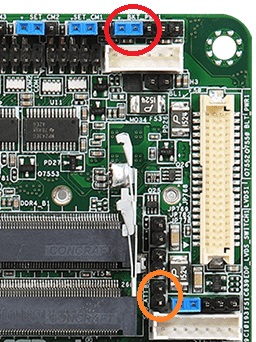
- Remove the red jumper and install it on the orange header.
- The red jumper controls LVDS voltage, which is not used in this system. It can safely be taken for use on the auto power on header.
- Auto power on is now enabled
Auto Power On (older boards)
IMB-1212 motherboards manufactured before June 2020 use a different jumper for auto power on. This jumper is not present on the newer boards.
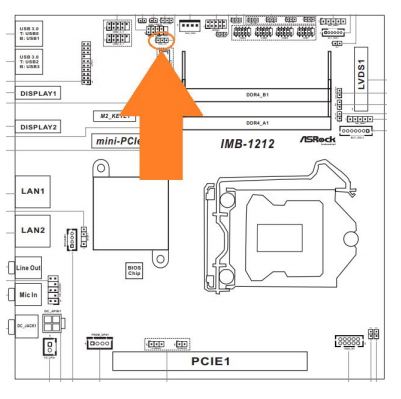
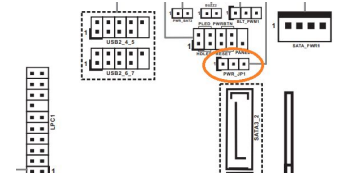
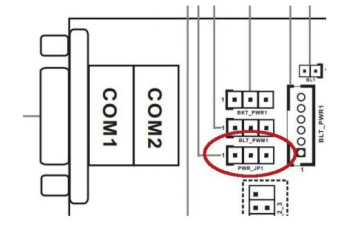
- Locate the PWR_JP1 jumper indicated by the orange circle
- Move PWR_JP1 over by 1 pin
- The unit is now configured for auto power on
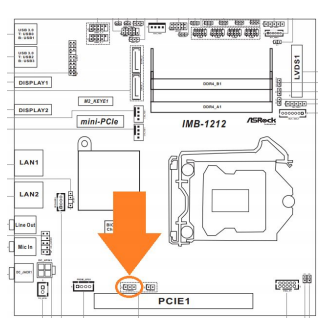
Motherboard Reset (Clear the CMOS)
- Unplug the system completely from power and all peripherals
- Locate the clear CMOS jumper
- Move the jumper over by 1 pin
- Wait 30 seconds
- Restore the jumper to its original position
- The CMOS is now clear
MC510-40 (TM800)
ASRock IMB-V1000M Motherboard
Motherboard Manual
http://download.asrock.com/IPC/Manual/IMB-V1000.pdf
Drivers
https://www.asrockind.com/IMB-V1000
Enable Auto Power On
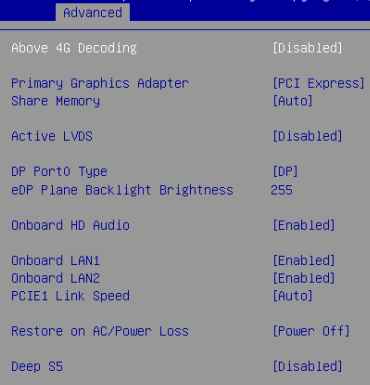
- Power on the unit and press the F2 key to access the BIOS
- Navigate to the Advanced tab
- Open the Chipset Configuration menu
- Change “Restore on AC/Power Loss” to [Power On]
- Press F10 to save changes and exit
- Auto power on is now enabled
Motherboard Reset (Clear the CMOS)
- Unplug the system completely from power and all peripherals
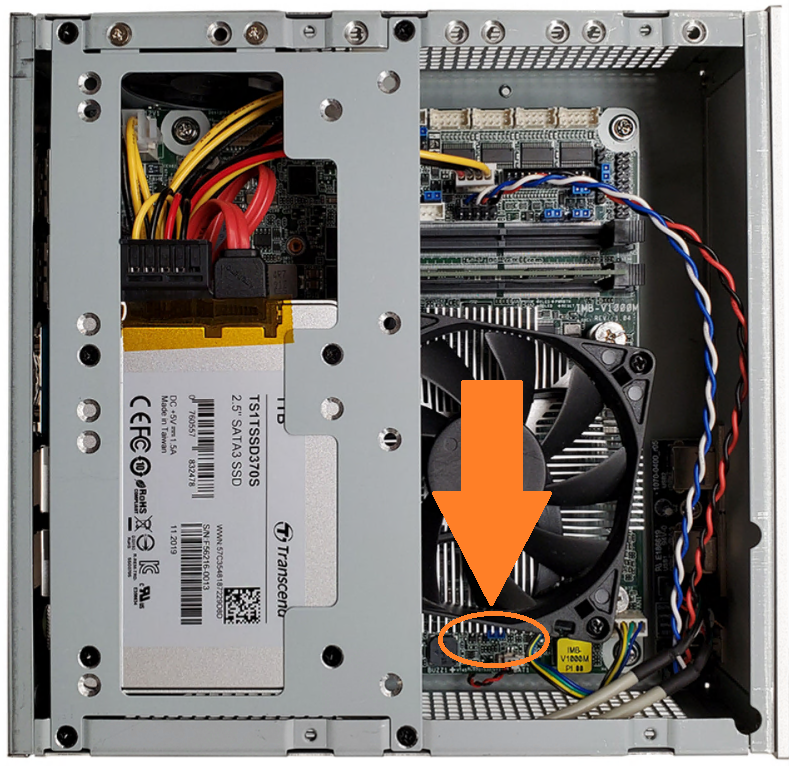
- Locate the clear CMOS jumper
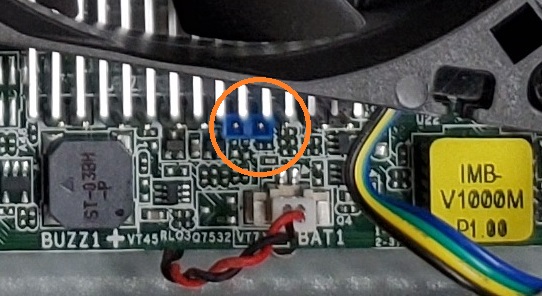
- Move the jumper over by 1 pin
- Wait 30 seconds
- Restore the jumper to its original position
- The CMOS is now clear
MC510-10
Product Manual
https://drive.google.com/open?id=1MfhkgP-nIvFr2dgr_zUESwelq7knS7hW
ASRock IMB-156 Motherboard
Drivers
https://drive.google.com/open?id=1Qxk2BYDbPggBa89RNpVPdkqu640DIPmh
Auto Power On
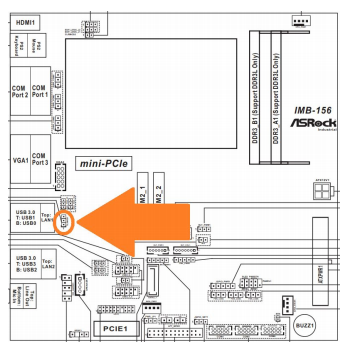
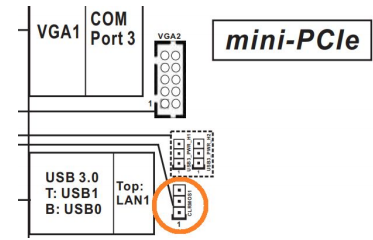
- Locate the PWR_JP1 jumper indicated by the orange circle
- Move PWR_JP1 over by 1 pin
- The unit is now configured for auto power on

Motherboard Reset (Clear the CMOS)
- Unplug the system completely from power and all peripherals
- Locate the clear CMOS jumper
- Move the jumper over by 1 pin
- Wait 30 seconds
- Restore the jumper to its original position
- The CMOS is now clear
MC510-PH14FEI
Mitac PH14FEI-H310-12V Motherboard
Product Manual
https://static.onlogic.com/resources/manuals/PH14FEI_ProductGuide_v0.2%2020200212.pdf
Drivers
https://www.mitacmct.com/IndustrialMotherboard=PH14FEI=PH14FEI=downloads=EN
Auto Power on
- Power on the PC and immediately press the Del key a few times to access the BIOS.
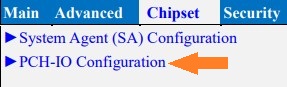
- Using the arrow keys, navigate to the Chipset tab and open the PCH-IO Configuration menu
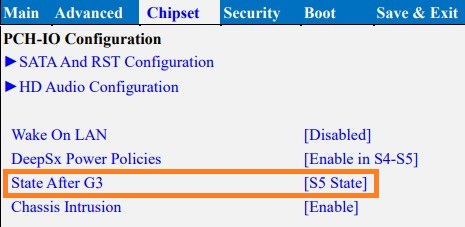
- Change the option “State After G3”
- S5 State – Disable auto power
- S0 – Enable auto power

- Save changes and reset.
Motherboard Reset (Clear the CMOS)
- Unplug the system completely from power and all peripherals
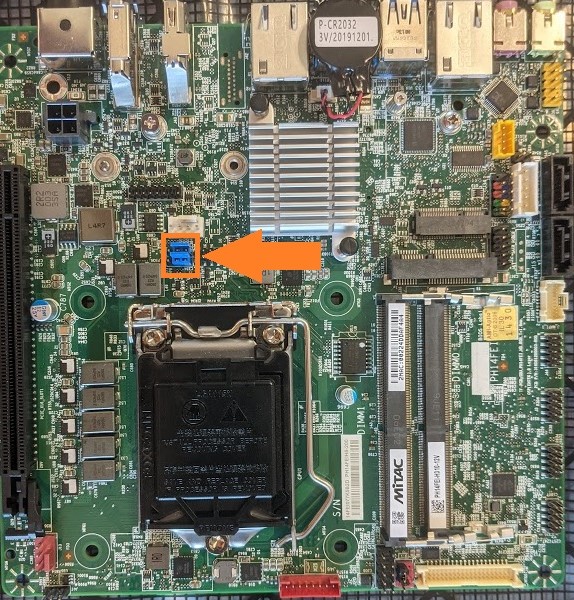
- Remove the case lid.
- Locate the clear CMOS jumper.
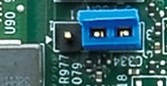
- The jumper will be in this position.
- Move the jumper over by 1 pin as shown.
- Leave the jumper there for 30 seconds.
- Restore the jumper to its original position.
- The CMOS is now cleared.
MC500G-51
ASRock IMB-195 Motherboard
Product Manual
https://drive.google.com/open?id=12vOyAy8vuB0YlUG2v3wUMsoA-obvbsuE
Drivers
https://drive.google.com/open?id=17HrQDHq6T1wK0dzS8-3OCSR1bVE6aGLU
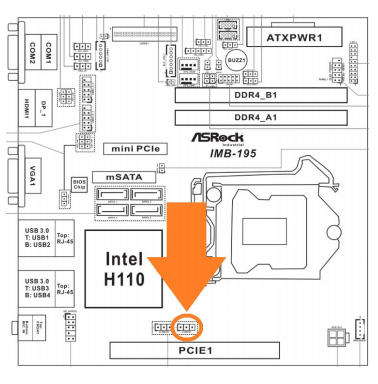
Auto Power On
- Locate the AT/ATX jumper
- Move it over by 1 pin
- Auto power on is now enabled
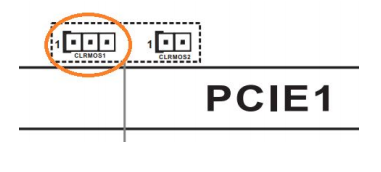
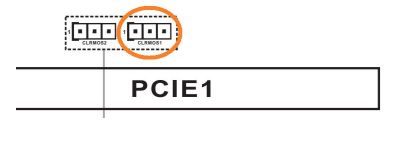
Motherboard Reset (Clear the CMOS)
- Unplug the system completely from power and all peripherals
- Locate the CLRMOS1 jumper
- Move the jumper over by 1 pin
- Wait 30 seconds
- Restore the jumper to its original position
- The CMOS is now clear
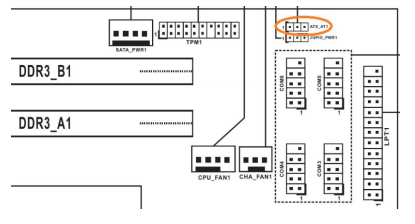
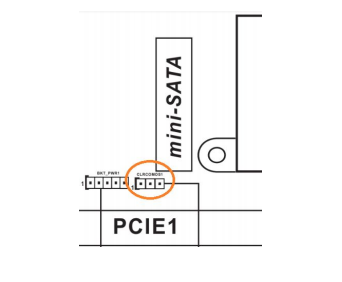
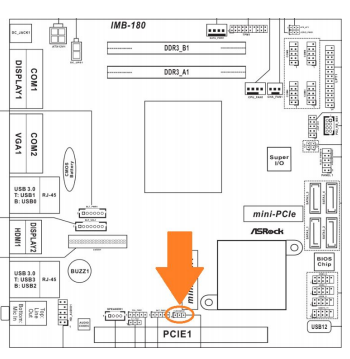
MC500G-50
ASRock IMB-180 Motherboard
Product Manual
https://drive.google.com/open?id=1pgxuCqbYT1mdY7Wht5JZbsZP8fBoLmPg
Drivers
https://drive.google.com/open?id=1RGYB0C90fm1qmc2LJzz8HILXeG7uh9dg
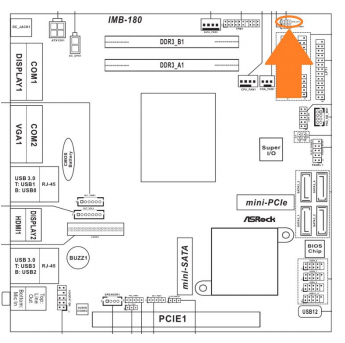
Auto Power On
- Locate the AT/ATX jumper
- Move it over by 1 pin
- Auto power on is now enabled
Motherboard Reset (Clear the CMOS)
- Unplug the system completely from power and all peripherals
- Locate the CLRMOS1 jumper
- Move the jumper over by 1 pin
- Wait 30 seconds
- Restore the jumper to its original position
- The CMOS is now clear
MC500G-30
Mitac PH12LI-P Motherboard
Product Manual
https://drive.google.com/open?id=1b169jNmg6aYm4gknHhkPZPyaBqjM60R2
Drivers
https://drive.google.com/open?id=1gzxFagz3ZWfDi7afXqg9SFpeFZNGZD9Q
Auto Power On
- Power on the unit and press the Del key to access the BIOS
- Navigate to the Chipset tab
- Open the PCH-IO Config menu
- Change “State After G3” to S0
- Save changes and exit
- Auto power on is now enabled
Motherboard Reset (Clear the CMOS)
- Unplug the system completely from power and all peripherals
- Locate the CMOS battery
- Carefully disconnect the white connector
- Wait 5 minutes
- Reconnect the white connector
- The CMOS is now clear
MC500G-10
Mitac PD11BI-P Motherboard
Product Manual
https://drive.google.com/open?id=1X9BdH34UMrzS9n-KNdNjooRbr_t6gZAl
Drivers
https://drive.google.com/open?id=1gvW9DaS29yZJf243pQ4oxGfV2ax6BYKS
Auto Power On
- Power on the unit and press the Del key to access the BIOS
- Navigate to the Chipset tab
- Change “Restore AC Power Loss” to [Power on]
- Save changes and exit. Auto power on is now enabled.

Motherboard Reset (Clear the CMOS)
- Unplug the system completely from power and all peripherals
- Locate the clear CMOS jumper
- Move the jumper over by 1 pin
- Wait 30 seconds
- Restore the jumper to its original position
- The CMOS is now clear