The MC600 and MC610 can be opened by the user. This does not void the warranty, however, any damage caused by doing so will not be covered.
The following steps will walk you through opening your MC600 and/or MC610 case, as well as auto-powering on and clearing CMOS.
Opening the MC600 & MC610 Case
The case is very simple to open. To do so, remove the two screws from the back and slide the lid off towards the rear.

The following information on how to enable Auto Power On and clear CMOS for your specific model. To jump to your specific model, view the product list on the right.
MC610-55
ASRock IMB-1232-WV Motherboard
Product Manual
https://static.onlogic.com/resources/manuals/OnLogic-MC510-55-MC610-55-Product-Manual.pdf
Motherboard Manual
https://static.onlogic.com/resources/manuals/IMB-1232-WV-Motherboard-Manual.pdf
Drivers
https://static.onlogic.com/resources/drivers/IMB-1232-WV
This will download drivers for Windows 10 and 11, be sure to use the drivers for your specific operating system.
BIOS Updates
| Version | Link |
|---|---|
| P1.60B | Download |
Auto Power on
Auto power allows the computer to automatically power on when power is applied/turned on. This is useful when the system needs to stay running all the time, and will come back up after a power outage. Systems can have this enabled on new orders, but you can follow these steps to enable this setting for any units in the field.
Note that you will need a 2-pin jumper to enable this setting. If you need a 2-pin jumper, you can contact our sales team to order the [HWP134] Board Jumper, 2×1. They can be contacted at info@onlogic.com, or by calling 802 861 2300 ext. 3.
- Unplug system from power and all peripherals.
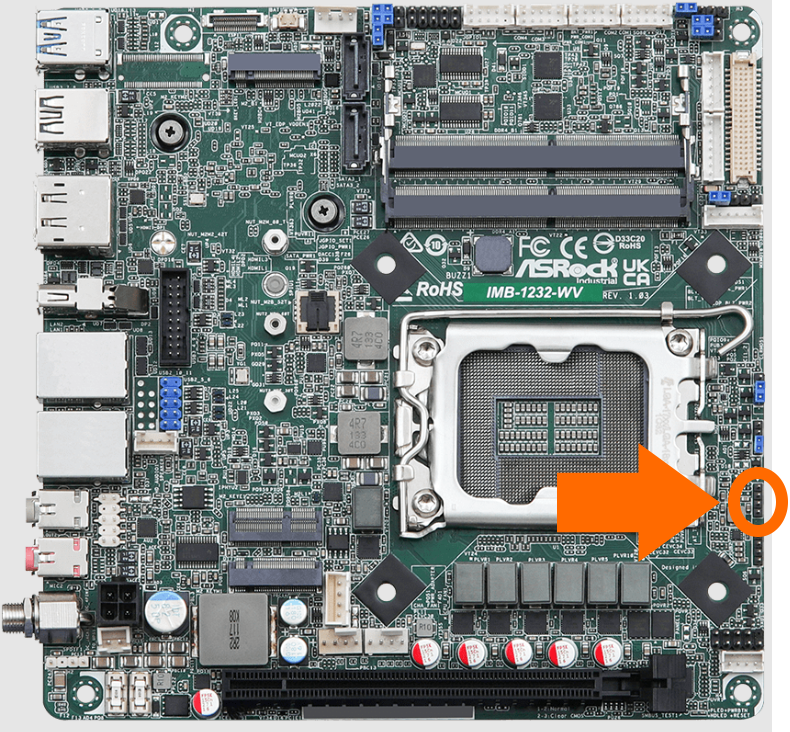
- Opening the system, then locate the 4-pin header circled in orange.
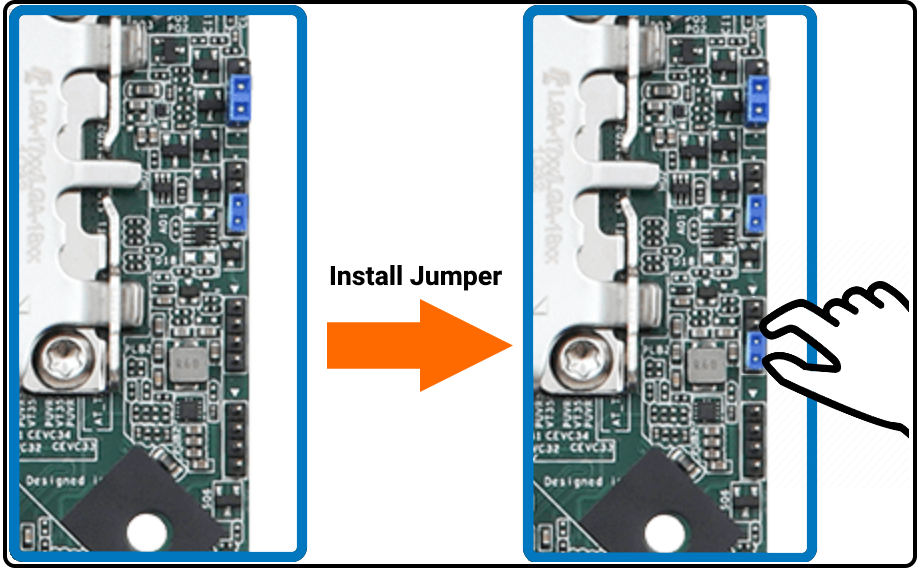
- Install 2-pin jumper to pins 3+4 as shown below:
Motherboard Reset (Clear the CMOS)
- Unplug the system completely from power and all peripherals
- Locate the clear CMOS jumper on the 3-pin header here:
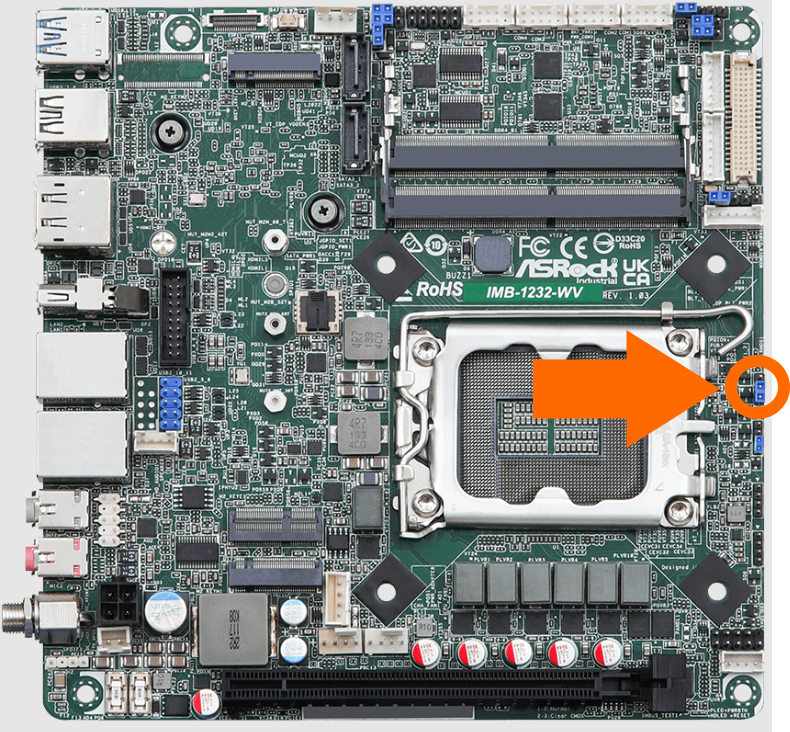
- The jumper’s original position closes pins 1+2, move the jumper to the “Clear” position so that it closes pins 2+3 (move over by :
- Wait 30 seconds
- Restore the jumper to its original position
- The CMOS is now clear. Reassemble the computer and re-test.
Terminal Block
The MC610-55 chassis supports a DC power input via a 4-pin terminal block connection (Mating part: Dinkle 2ESDAM-04P or equivalent). The pinout is as follows:

Further details can be found in the MC510-55/MC610-55 Product Manual, on page 16.
MC610-50 / TM610
ASRock IMB-1212 Motherboard
Motherboard Manual
https://download.asrock.com/Manual/IMB-1212.pdf
Drivers
https://drive.google.com/drive/folders/1l9imqOhuOHG4bkKDXCb7vxUODlV-qX8m
Auto Power On
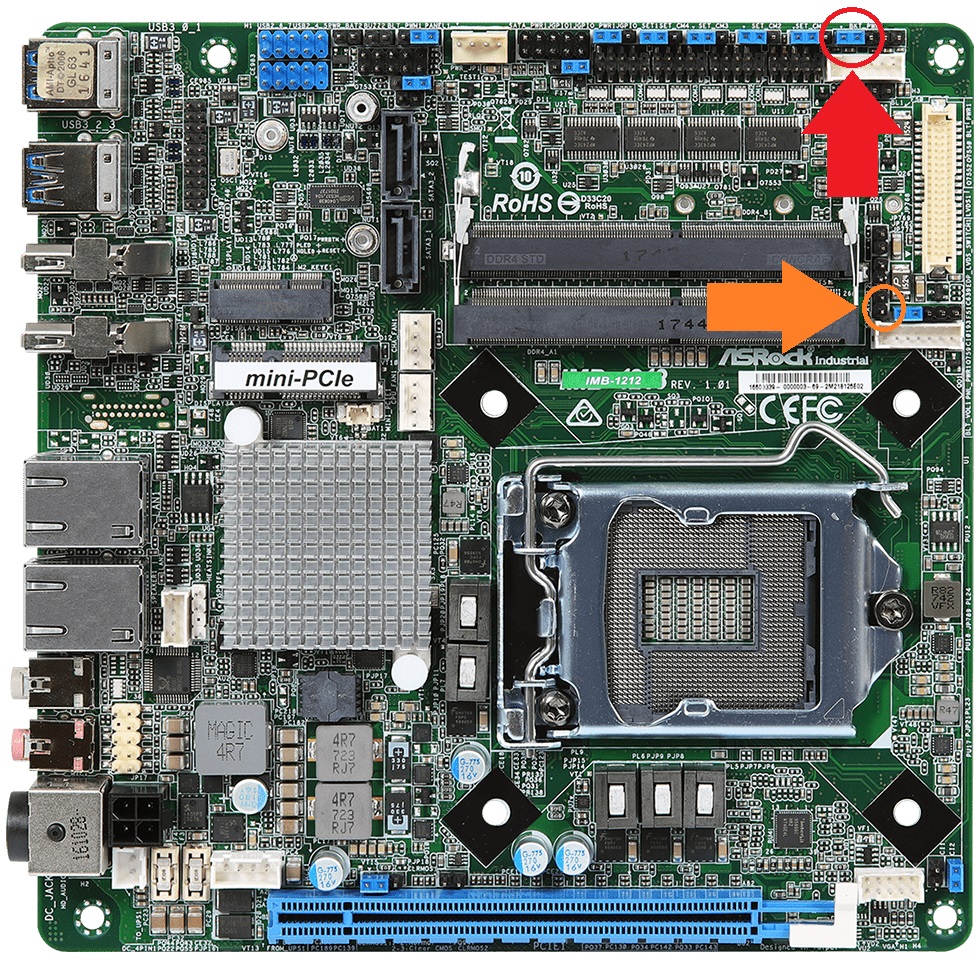
- Locate the jumper circled in red and the pin header circled in orange
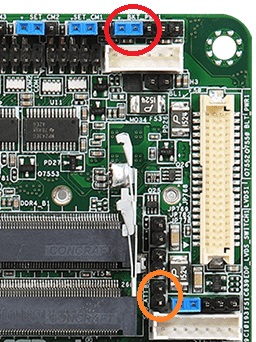
- Remove the red jumper and install it on the orange header.
- The red jumper controls LVDS voltage, which is not used in this system. It can safely be taken for use on the auto power on header.
- Auto power on is now enabled
Auto Power On (older motherboards)
IMB-1212 motherboards manufactured before June 2020 use a different jumper for auto power on. This jumper is not present on the newer boards.
- Locate the PWR_JP1 jumper indicated by the orange circle
- Move PWR_JP1 over by 1 pin
- The unit is now configured for auto power on


Motherboard Reset (Clear the CMOS)
- Locate the clear CMOS jumper
- Move the jumper over by 1 pin
- Wait 30 seconds
- Restore the jumper to its original position
- The CMOS is now clear


MC610-10
ASRock IMB-156 Motherboard
Motherboard Manual
https://drive.google.com/file/d/1MfhkgP-nIvFr2dgr_zUESwelq7knS7hW/view
Drivers
https://drive.google.com/drive/folders/1Qxk2BYDbPggBa89RNpVPdkqu640DIPmh
Auto Power On
- Locate the PWR_JP1 jumper indicated by the orange circle
- Move PWR_JP1 over by 1 pin
- The unit is now configured for auto power on

Motherboard Reset (Clear the CMOS)
- Locate the clear CMOS jumper
- Move the jumper over by 1 pin
- Wait 30 seconds
- Restore the jumper to its original position
- The CMOS is now clear


MC600-52
ASRock IMB-195 Motherboard
Motherboard Manual
https://drive.google.com/file/d/1aOXjswH-6bzg7sa-ToxEOFRZIkhLxn0b/view
Drivers
https://drive.google.com/drive/folders/17HrQDHq6T1wK0dzS8-3OCSR1bVE6aGLU
Auto Power On
- Locate the AT/ATX jumper
- Move it over by 1 pin
- Auto power on is now enabled


Motherboard Reset (Clear the CMOS)
- Locate the CLRMOS1 jumper
- Move the jumper over by 1 pin
- Wait 30 seconds
- Restore the jumper to its original position
- The CMOS is now clear


MC600-51
ASRock E3C226D2I Motherboard
Motherboard Manual
https://drive.google.com/file/d/1395B6QaXh9YrZ3c8uqbcD_NVc1TKSGc4/view
Drivers
https://drive.google.com/drive/folders/1u68Rw9G7YfK4tV1FTj1N_fljHAdrO6AX
Auto Power On
- Power on the unit and press the F2 key to access the BIOS
- Navigate to the Advanced tab
- Open the South Bridge Configuration menu
- Change “Restore on AC/Power Loss” to [Power on]
- Save changes and exit from the Exit menu
- Auto power on is now enabled
Motherboard Reset (Clear the CMOS)
- Locate the CMOS battery
- Carefully remove it from the holder
- Wait 5 minutes
- Reinsert the battery
- The CMOS is now clear


MC600-50
ASRock IMB-181 Motherboard
Motherboard Manual
https://drive.google.com/file/d/1rPMVDCir1XRsSNpKGgUmd0RXDpSOmxww/view
Drivers
https://drive.google.com/drive/folders/1RI7U0gtxFDJszG4u98IqBHzVZWDxqriS
Auto Power On
- Locate the AT/ATX jumper
- Move it over by 1 pin
- Auto power on is now enabled


Motherboard Reset (Clear the CMOS)
- Locate the CLRMOS1 jumper
- Move the jumper over by 1 pin
- Wait 30 seconds
- Restore the jumper to its original position
- The CMOS is now clear


MC600-11
ASRock IMB-156 Motherboard
Motherboard Manual
https://drive.google.com/file/d/1MfhkgP-nIvFr2dgr_zUESwelq7knS7hW/view
Drivers
https://www.asrockind.com/overview.asp?Model=IMB-156D#osW1064
Auto Power On
- Locate the PWR_JP1 jumper indicated by the orange circle
- Move the PWR_JP1 over by 1 pin
- The unit is now configured for auto power on

Motherboard Reset (Clear the CMOS)
- Locate the clear CMOS jumper
- Move the jumper over by 1 pin
- Wait 30 seconds
- Restore the jumper to its original position
- The CMOS is now clear


MC600-10
Mitac PD11BI-P Motherboard
Auto Power On
- Power on the unit and press the Del key to access the BIOS
- Navigate to the Chipset tab
- Change “Restore AC Power Loss” to [Power On]
- Save changes and exit
- Auto power on is now enabled

Motherboard Reset (Clear the CMOS)
- Locate the clear CMOS jumper
- Move the jumper over by 1 pin
- Wait 30 seconds
- Restore the jumper to its original position
- The CMOS is now clear
